Sunday 24 March 2013

OCTOBER 2012 (History) MINE TRACK LAID & NEW PLANS

The reason we built the hills before we laid the track under them was due to finances. We had to wait until Mr Mayfield could buy more track. if we had held up production until we could afford the track we would get nowhere. So we had a very tricky job of laying the mine track under pre-made hills.

Posted Image


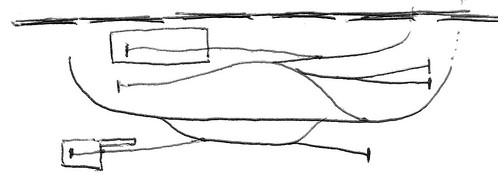
Points are so expensive BUT they really add to the railway.
Posted Image
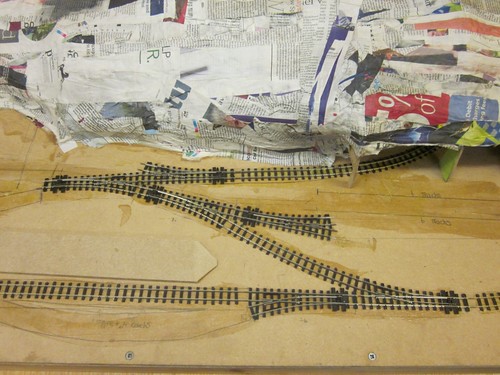
Lots of points will make wiring up very hard but it means we have to learn more planning and control systems.

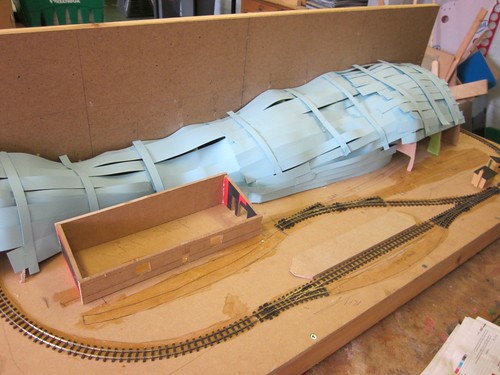
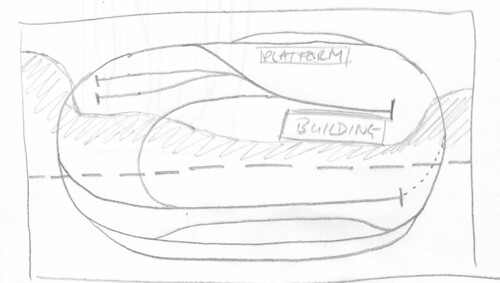
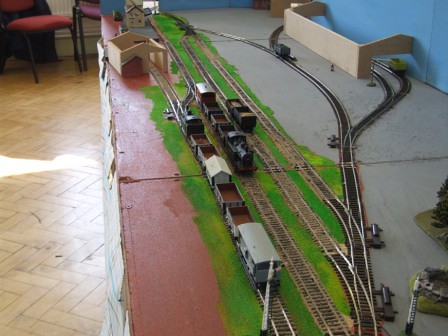
We decided that we wanted a track to run into the workshop - so we have added a new point.
Posted Image

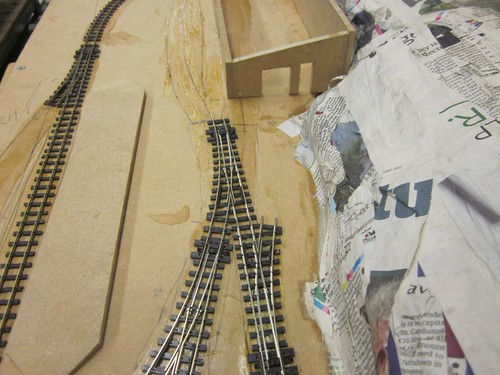
Now we have also decided to have two more points on the front to allow us to head shunt and drop off goods trains. Again in the future we can have a 'key' system for the passing loop and we can work out a running sequence including deliveries to the good shed.

Posted Image

OCTOBER 2012 (History) ROLLING STOCK BOUGHT

Mr Mayfield went to the M5 M50 show and bought 12 hoppers which need to be painted and weathered. We will fill 6 of them and leave 6 empty.
This means we can run one 6-wagon train empty into the mine and one 6-wagon train full out of the mine.

Mr Mayfield also bought an 0-6-0 steam loco. This will pull the passenger train that we have started making.

Posted Image

OCTOBER 2012 (History) COVERING THE HILLS

Thumbs up for mess and stodge and gloop

Posted Image

And this is where we are up to today.
Posted Image

The main outside loop is wired up and ready to run.
We have some extra sidings to put down and the fiddle yard to sort out.     

OCTOBER 2012 (History) MAKING THE FIRST BUILDING

Next we wanted some basic buildings.
We really wanted a workshop.

Basic MDF construction again
Posted Image

We decided wereally wanted to run a track into the building - so Mr Mayfield went off to buy another point.

Doors and windows cut roughly
Posted Image
  

OCTOBER 2012 (History) MAKING THE HILLS

We have started making the hills - Cutting out card templates at first then sticking to thin MDF and cutting out with a scroll saw. Hot glue gun to the back meant we could do it in a lunchtime.

Posted Image

and then covering with card strips
Posted Image

Posted Image

Again all done with a hot glue gun in 45 mins.

JUNE 2012 (History) MAKING THE BACK BOARD

Lots of interuptions to the making schedule.
We managed to make the backboard for the railway though

Posted Image

As you can see we have laid some more track

MARCH 2012 (History) PLANS CHANGED


A member of the Narrow Gague Modellers Forum suggested that we change the back scene to make it more flowing
Posted Image
But in the end we went for a straight back board as we thought it would be easier to make.

Posted Image

MARCH 2012 (History) LAYING THE TRACK

BASEBOARD - MDF on a pine batton frame. Screwed and glued.

We had to learn about pilot,clearance and countersink drilling.

Posted Image

Posted Image

The track has been laid with contact adhesive - this provided good instant results and stopped the rails being bashed with pin hammers! We have left fishplate(connectors) on. This helps us to lay flat well connected track.

MARCH 2012 (History) LAYOUT PLANS

Layout ideas.

We discussed lots of ideas for the layout - engine sheds, mines, docks etc.
We wanted turntables, sheds, brdiges, mixed scales - allsorts.

In the end we worked it down to the plan below.

Posted Image

The good things about the plan are that
it runs around - so it is ideal for a first time layout.
it has a mine and sidings that can be loaded with full/empty trains
While the mine section is working - passenger and other goods trains can pass at the front of the layout.

MARCH 2012 (History) WIRING UP TEST TRACK

Now to wire up the test track.
Mr Mayfield brought in a controller.

Posted Image

This needed some new skills. (Well using our D&T skills in a different way really)

We put the wire under the board, back up and soldered it to the out side of the rails.

Posted Image

Mr Mayfield brought in a 009 loco and a 00 loco so that we could test both tracks.

Saturday 23 March 2013

MARCH 2012 (History) MAKING KITS

A Great Donation

Colin Ashby donated some of his kits to the club. This was fantastic as it meant that we learn some new skills. It also gave us a look at the scale of the railway and meant that we had something to put on our test track.

Posted Image

Posted Image

MARCH 2012 (History) MAKING A TEST TRACK


Learning the basics

We decided to make a test track as a practice.
We thought we may have a 00 section on our layout so we had a go at 009 and 00.

Posted Image

Here we are laying the track with small nails.

OCTOBER 2011 (History) TEACHER FALLS OFF BOAT

OCTOBER 2011
DISASTER STRIKES - Teacher falls off boat and breaks leg.

Mr Mayfield is off for nearly two terms and so the railway is put on hold.

By the time Mr M has caught up it is

MARCH 2012
Layout decisons - The biggest problem with the previous railway that Mr Mayfield made was that it was in 3 big sections. It took so long to set up and take down that it hardly got used.

The decision was taken to make a layout on one small board (1200 X 600mm)

As Mr Mayfield had lots of 009 stuff at home it was decided that the layout would be a 009 railway.

The start of the club.
The model railway started after a number of enthusiastic pupils asked for a D&T club to run at lunchtimes. Our first project was a balsa plane.
In conversation Mr Mayfield told the club of a model railway that pupils had made at his last school.

This was the layout - seen here partly finished at the Stonehouse Model Railway Show.

Posted Image

Posted Image

Pupils asked if they could start their own railway.
Newent Community School Model Railway Club was set up in June 2011.
Shortly afterwards we decided to make a 009 layout.

This blog has been set up so that pupils involved in the club can post their own progress.

To begin with I will post a 'history' of our efforts.

Once this is done I will hand over the blog to the pupils.

Mr Mayfield